Image above captured on the upper deck of the layout where scenery has progressed to some extent...
Shot with Olympus C-750

Welcome to the SP Oregon Division!

An N Scale RR depicting the good old days along "The Friendly".

Sunday, January 28, 2024

Thursday, August 13, 2020

Lumber Mill Structures


I have reworked some of the trackage for my Pope and Talbot lumber mill at Oakridge. There are now two tracks in the back to handle the increase of woodchip traffic that JMRI Ops (generated switchlists) needed to keep car flow moving. The track arrangement is actually closer to the original SPINS configuration this way (my only current view of what trackage looked like) Was happy to find Republic Locomotive Works still offered their (laser) woodchip loader that I needed to have a matching pair. 
Still begging for some stain

 I also picked up one of their bin loaders for my planned fleet of chip truck haulers (Hello, Trainworx?). This was another laser wood kit that I still have to add the ladders onto, but its got a coat of green paint (since this shot) and getting close to completion. 

I also relocated a couple other tracks which made more room for placement of my loading warehouse kitbash. It was a combination of two Bingen kits from Reiten Models (well executed laser wood kit). 

The mill property fills a corner that was landscaped with hardshell scenery. It has recently had the stark white plaster covered with some ground color (ha, it could be 20 years old at this point). I relocated the Walthers lumber mill (another unfinished kitbash) from where the warehouse sits more to the front since its footprint wasnt playing nice for operator access (I wish it had been more feasible to invert it the opposite configuration). Eventually there will be an array of pneumatic tubes blowing sawdust to all the loaders and the slash burner. Pondering where to cut in a service road as the whole plant is currently land locked...

Wednesday, August 12, 2020

Hampton Bridge


SP’s Willamette river crossing at the tail of Lookout Point Reservoir was via three through truss sections (basically) in the middle of three plate girder sections. 
Ron Harr image:

Space on the layout here only permitted half that, with one thru truss and a plate girder on each side of that. It was hard for me to follow through on construction due to the model being so condensed, but I continued to persevere through with an attempt to Espee-ize the more prominent components.
For construction, minor modifications to the Atlas (early style) plate girder bridges entailed raising the roadbed, and adding gussets on the inside of the plate girders. I modified the Atlas (late version) thru truss bridge from an open deck to a ballasted deck, and added handrailing on both sides.

 I also reworked the shape of the portal openings, which regained lost clearance from the ballasted deck conversion. Other mods included adding plates where the bridge sections are connected together, and Micro Engineering cast metal bridge feet.  
This bridge is part of the overall scene that includes the west end of Hampton siding, an important addition to operations of the layout. The opening behind the bridge is to help crews view train clearances and signal indications from opposing sides. Eventually a tree line will mostly obscure the opening in an effort to keep the scene fluid. 

I still need to modify the styrene bridge piers that Art built to accept the offset foot patterns, and paint the overall structure, then ballast will go in after the ground cover. 

Tuesday, August 11, 2020

Eugene Yard Structures


 With scenery having progressed through the yard area now, I have begun working on some related structures. The bigger projects to come will be the engine house and sand towers around the diesel service area. Meanwhile I have a few of the DeLuxe office / maintenance sheds, and a BLMA yard office filling some open space, but needed more structures to bring things alive. So I pulled out a couple brass Alkem yard light tower kits that had been sitting in a box for years. They arent perfect for what Espee had in this yard, but I was ok with them for now until something better comes along (or I want to take the time to scratchbuild new top sections). It was a bit of a challenge for me in getting the tower sections bent. I cobbled together some straight edges and clamps to hold things square while I proceeded through the bends, but felt uneasy about making the wrong move due to lack of proper tools. 

Luckily things went well, and the rest of the project fell together pretty smoothly. I soldered the larger sections that were readily accessible and used ACC for assembly of the finer details. I built two of these kits together in an effort to be more productive with the assembly process. The lamp holders still need to be bent into shape, and then they will receive some black paint. They each have a home on opposing ends of the yard. 

While I had sharpened my skills with these kits, it was a good time to drag out a pair of old brass yard tower kits I had from Traincat. These were a close match to what was on Espee’s property back in the day.
With these kits being a bit more complicated, I decided to get a 3-1/2” metal seamer tool from Harbor Freight, to ensure each bend was sharp and square. See link Hand Seamer. I would have preferred a few more line up keys on some steps of the overall kit, but they were fun projects to build otherwise. 

I have all the glass cut out and ready for Alclad tinting, and I recently picked up the Vallejo paint colors for both these projects. 
East end Eugene Yard

You can barely see the other family members at the opposite end of the yard.


Monday, August 10, 2020

Scenery Progress

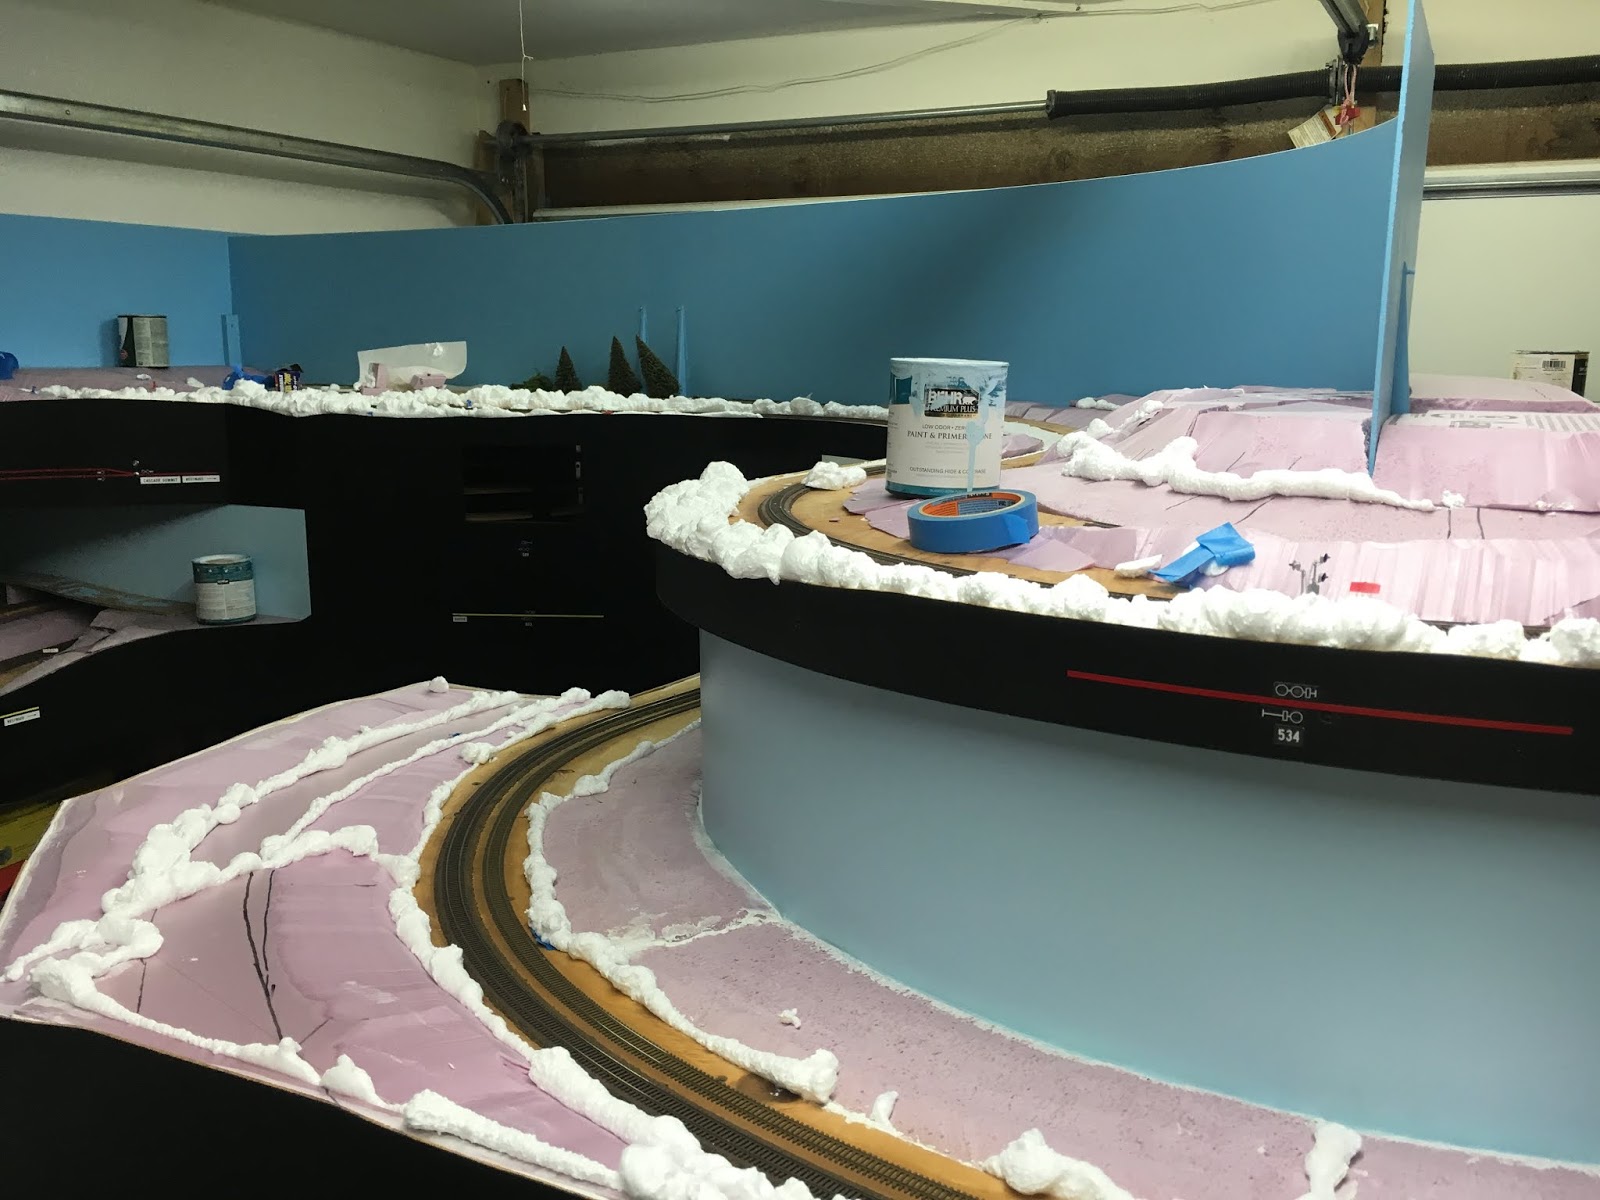
The layout has been neglected scenery wise for far too long. I just seemed to get stuck in a rut daunted by all the rough scenery everywhere, and couldnt seem to make any progress. Art offered to help out, and over a number of visits we got a large swath of foam base contouring done with his hot knives (before the covid hit). Thanks Art!  I have been progressing with renewed enthusiasm ever since.  One of the main reasons I switched from hardshell plaster to the extruded foam was to make it easier for planting trees. Even using silicone caulk in between blocks was of concern in this regard, so I used Loctite expanding foam in a can where possible. Most minor carving was done with a knife, and final contouring was done with rough and med grades of sandpaper. Minimal filling was also done with Sculptamold and Dap lightweight spackle. 

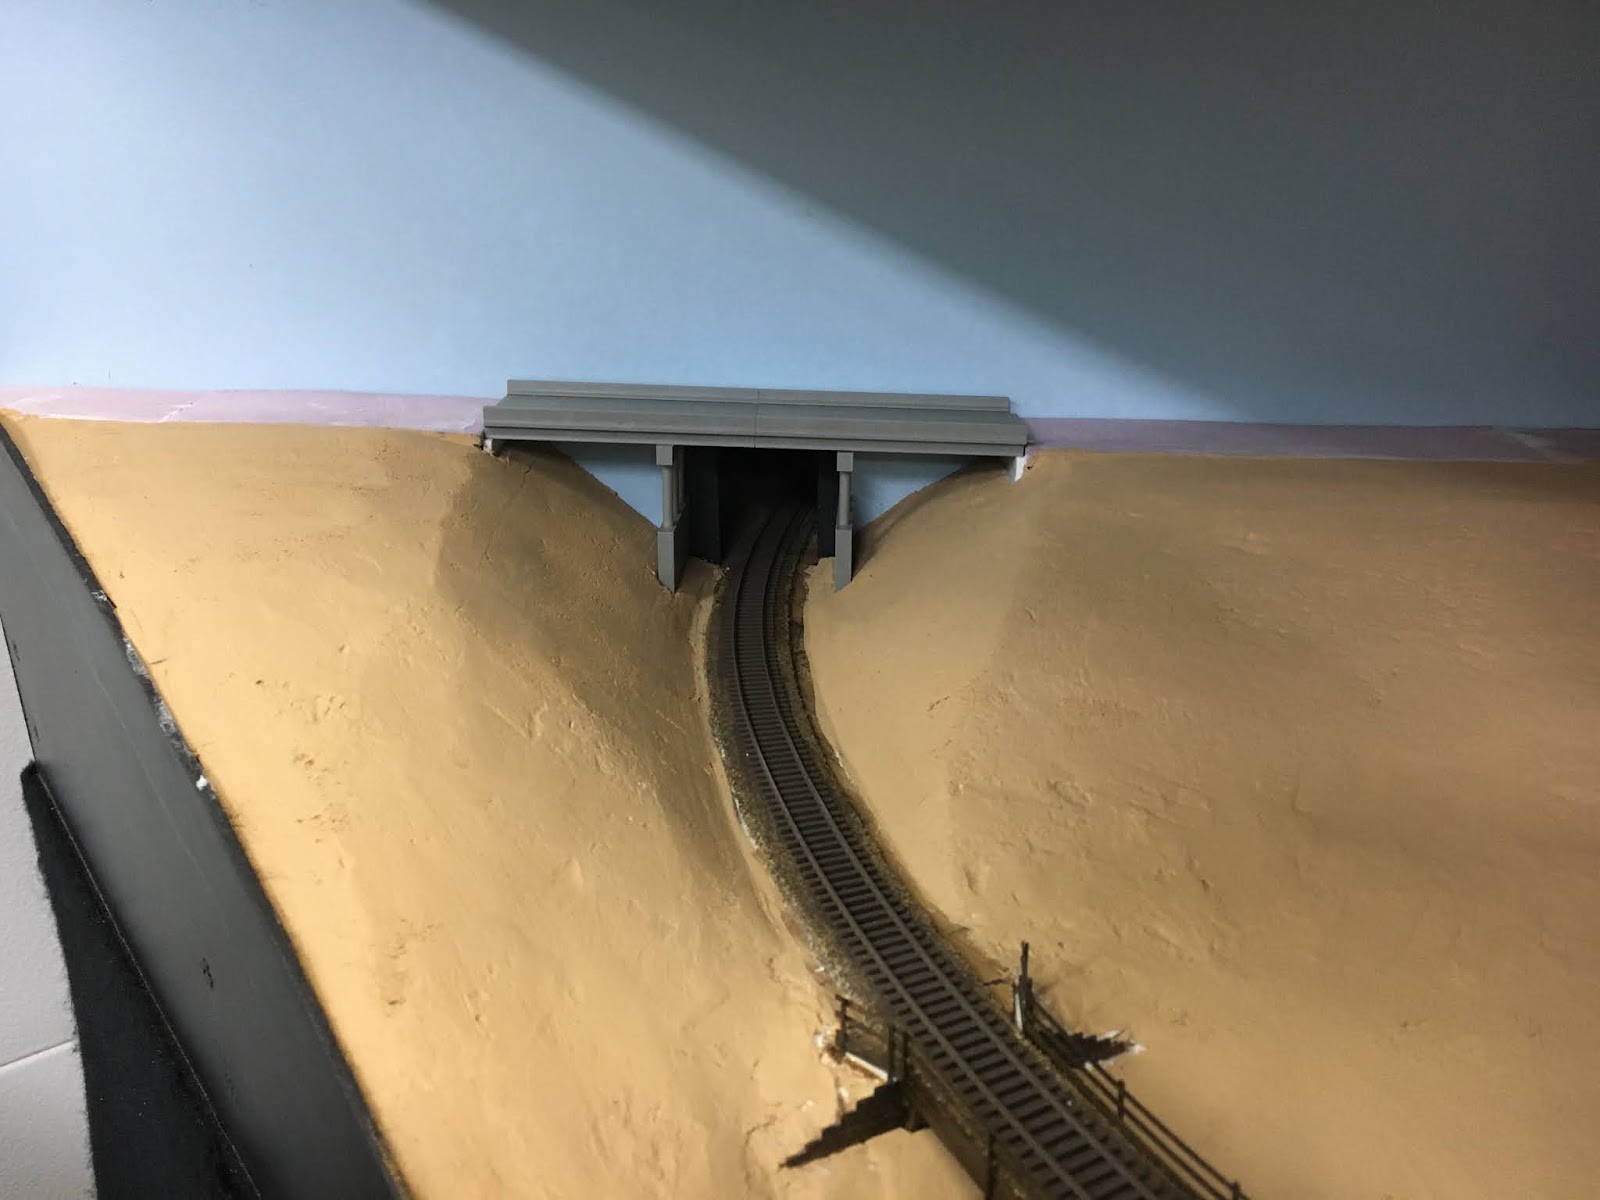
Basic scenery has finally made completion around both decks of the layout including a coat of earth color tone.  No more white plaster or pink foam showing anywhere... but still lots of scenery work to do. I find myself falling back in my old ways from the construction industry, where everything needs to be done in a production line mentality for efficiency. So part of the basic scenes need to be completed before I want to proceed with ground cover. This had me working on a number of bridge projects, the wood trestle, a through truss / plate girder bridge (that post is in draft), and three (of four) highway overpasses. The highway overpasses were the last major scenic hurdle in completing the basic scenery. All are Rix kits with the ends slightly modified to adapt better to my abutment configurations, and are near ready for paint. The current state of bridge progress finally brings to light my original plans on coping with entry into the helix, and the return loop. Original construction had the track entering the helix with the ground foam extending on the opposite side of the backdrop, with the intent of lighting the opposing side, but I have since retracted on feeling there was a need over how it has evolved at this point. I used a light black paint under the bridges to fill in between the bridge piers adjacent to the portholes as needed. I dont find it as offensive as I once thought it would be having the track disappear into carefully placed blackness under the bridge(s). Contouring the scenery to work with these was a bit of a scenic hurdle for me, but I can finally see what I had originally designed over 20 years ago (sic)!
This is the entry into the helix on the lower deck that had stumped my enthusiasm for years

And where it has progressed to so far (I am not liking how tall the concrete supports are and will have to partially block their view in hopes of masking them a bit...)

Glenwood Blvd (cheating a bit) will run the length of the backdrop here, behind the trees/foliage. There are actually two bridges I needed to install to deal with the backdrop.
Before

After

And the other overpass in back (needs a bit more after lookin at that shot)

Early overall shot of the return loop

Almost ready to pave the road and add ground cover

The Supertrees are itchin to find a home

Get er done already...


Sunday, August 9, 2020

Ballasted Deck Trestle

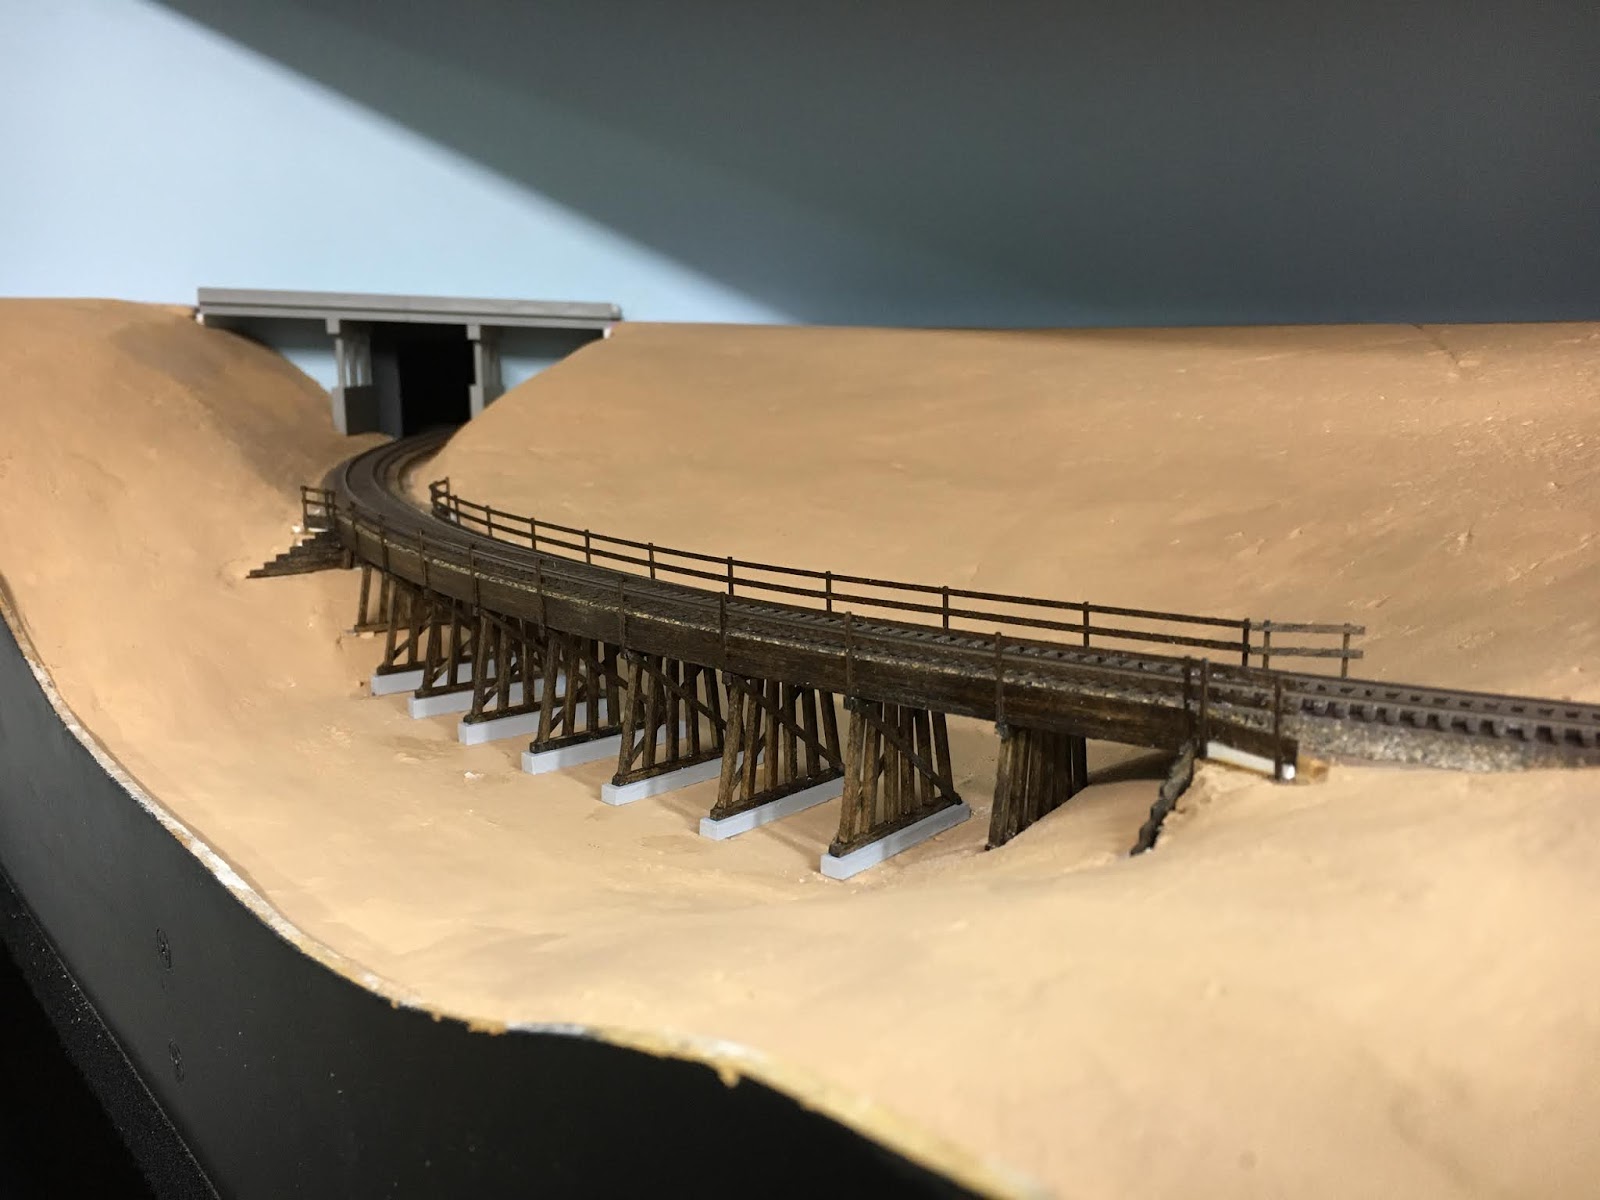
The bridge at Springfield Jct is an unknown structure to most, that crosses a mostly dry wash. I needed it to break up the bland scene of thick trees/foliage that will disguise the Siskiyou Sub actually being a stub track. On all my previous bridge builds I had cut out the full length of plywood roadbed when the time came to actually install the bridge. It was always a pain to cut, and without damaging anything. This time I wanted to preserve the integrity of the track already in place, and I tried a different method. Art helped me thin down the existing plywood layers from underneath with an oscillating tool. Then I used a combination of extruded foam and Sculptamold to rough in the scene. 

A facade deck would be layered onto the edge of the existing plywood roadbed. This was a bit more entertaining with the bridge on a curve as opposing sides were different lengths/spacing, and would not hold shape while gluing bowed deck sections.
The mockup:

I used SP Common Standards to figure construction and lumber standards. I ordered the scale lumber from Kappler, and used a Minwax walnut stain marker to represent the look of creosote. I built up a quick template to mass produce the bents, and another for the end railings as they ended up being tedious to build (then had to do them all twice due to measuring error).

The deck/handrail sections were glued with contact cement to allow time to position them. I realized halfway through the project that the prototype had raised the ballast at some point and cut the wood railings, replacing them with unistrut and cables. I ended up installing the wood railings on mine as I much preferred the original look, even though I still had to move forward with the raised deck. More extruded foam was used to fill in the large gaps below the timber bulkheads, to help calculate the length of the shorter bents, while preserving the needed slope of the bank. The wash will get an extra thick layer of dirt to basically hide all but a few of the concrete foundations. This is the only wood bridge I have built, and adds to the variety of different bridge types on the layout. 

Looking forward to when the deck can be ballasted.


Saturday, August 8, 2020

LokSound Decoder Projects


The number of locos in the sound fleet continues to grow.  I am up to seven units with ESU LokSound decoders now. All new sound installs have been getting the 73100 Select Direct Micro with a 9x16 speaker/enclosure. Not sure what Im going to do with the loss of their hardwired short board going to the Next18 connector, but I have been able to get the 73100 board into all my needed six axle conversions... so far (Hello ESU?). With the size of the active fleet making it difficult to put sound in all units, the short term goal has been to at least get one sound unit in each lashup. Typically I run the sound unit as second in consist so the overall sound is coming from the “train” rather than just the lead unit, but really they all Need sound. As a result I have not been taking the time to complete the full SP light packages as on some before, but am planning eventually to finish the fleet in one mass production line someday... The easiest install has been the IM tunnel motors with basically a plug and play install, vs a couple most difficult old school Kato units that I had to do more grinding on the frame halves, to fit the board above/between the motor saddles. Just amazing what a jump in quality these are from my first Dgtrx sound installs, as these all run and sound just great. I was thinking I would have to add more capacitors to keep all these from cutting out when I first started, but I have not had any problems as long as I keep to the normal layout ops cleaning regimen.  I have been wiring the power feeds a bit different in an effort to keep cutout risk down to a minimum.

A 73100 specimen ready for implant into an Atlas SD9

How the above looks after install (power feed routing seen adjacent to speaker)

Results on a Kato SD40’s Guts

 The Kato U33C Grind (similar process on the SD40 also)

The tightest fit due to caps has been on the U33C

One of my old favorites, especially now with its FDL-16 chug


Friday, August 7, 2020

Box car fleet additions


Since the China factory shutdowns (and now Corona) the release of new products overall has been slow. Some of the backlog has finally started to hit the streets lately, but I have been getting frustrated from the lack of consistent product availability in N scale for quite some time (watching the HO scale pipeline isnt helping). I was happy to finally see the arrival of 4 new IM 50’ High Cube boxcars here, but the factory trucks and couplers just had to go. I replaced them with med draft MT 1037's for now, as the cars came with short shank body mount couplers and 36" wheels (just wrong). I mostly like the cars otherwise (x-LBF molds), but at some point I will body mount the extended draft couplers on them. By adding these cars to the layout, I was able to retire another block of stand-in MT 50’ SP/SSW boxcars that had never been up to my standards, and at this point I really wanted to get rid of more.  So I found 5 FVM 50’ FMC boxcars that had been forsaken on the back of my workbench that needed lowering. It was time to fix them and put my body mount Hydra-cushion couplers on them.

Before- you can see on the left how high these FVM double door boxcars rode as compared to a more accurate MDC/Roundhouse model 


After- is the lowered FVM with new extended couplers on left, coupled to the same MDC box (which has MT 1037 coupler). Note the difference where the etched platform now is with the coupler flush up underneath. This was done by grinding off some on the bolster, insetting the underframe deeper into the body, and notching the shell to make room for the extended body mount coupler (see body mount page).  The two cars have a different taper to the roof but are equal height at the peak.


The new fleet ready for assignment

Yes, they need a good layer of tunnel smoke too
I still have about 20 retired MT 50’ DD SP /SSW boxcars for disposal, if anyone is interested 

Thursday, August 6, 2020

Kato SDP40F Issues


Was struggling with repetitive stalling on one of my Kabo Kato LokSound units. Found that the OEM pc board that the Kobo installer soldered to, was barely making contact to one half of the frame via the board’s spring tension design, and that was no longer reliable. I ended up having to hardwire the decoder by tapping in a pair of 00-90 screws to fasten my own solder pads, which the power lead wires now connect to. 
The new pair of rectangular brass terminal blocks/solder pads installed:


The final install with black and red power leads soldered to new terminal blocks:


At one time I swore I would never model a passenger train on my layout. Not sure what happened but Amtrak’s Coast Starlight became an obsession over the years. I acquired rolling stock for the train(s) and started a couple kitbashes of this loco, then revisited a number of times over the years, but never followed through on the builds. Needless to say, but these locos look, run, and sound great, so really enjoying both my trains  #11 and 14 now. The only missing car(s) in the trains are the Pullman Standard 44 seat leg rest coaches. Maybe Kato can come through on that one someday too...

Wednesday, August 5, 2020

Removable Woodchip Loads


Been awhile since updating the blog (18 months), due mainly to planned obsolescence of devices and job justification of platform interfaces (ha), but hopefully have things working again so I can again share pics and bits of recent layout progress.

One of the biggest stumbling blocks for the layout having a continuous operating scheme here (ending and restarting ops at any point), had been the large amount of woodchip car loadings. There are currently close to 40 chip cars on the layout moving between the paper mill, staging, and lumber mills.  With all the non standard load sizes the chip cars required, it didnt seem very practical to utilize removable loads. Another issue was how to empty each of these cars without having to lift (or reposition) them from the layout, to avoid excessive handling. I had been restaging each car between sessions manually, which was a big pain anyway. I needed a way to load and unload the woodchips!  After diving into the use of JMRI Ops, I knew I had to figure a way to make the fleet of chip cars have interchangeable loads. The idea of staging identical car numbers and using the program to swap loads and empties sounded ok, but trying to acquire a loaded and empty version of each car number now days is dismal with manufacturers today releasing only one limited run of models (too late now). 
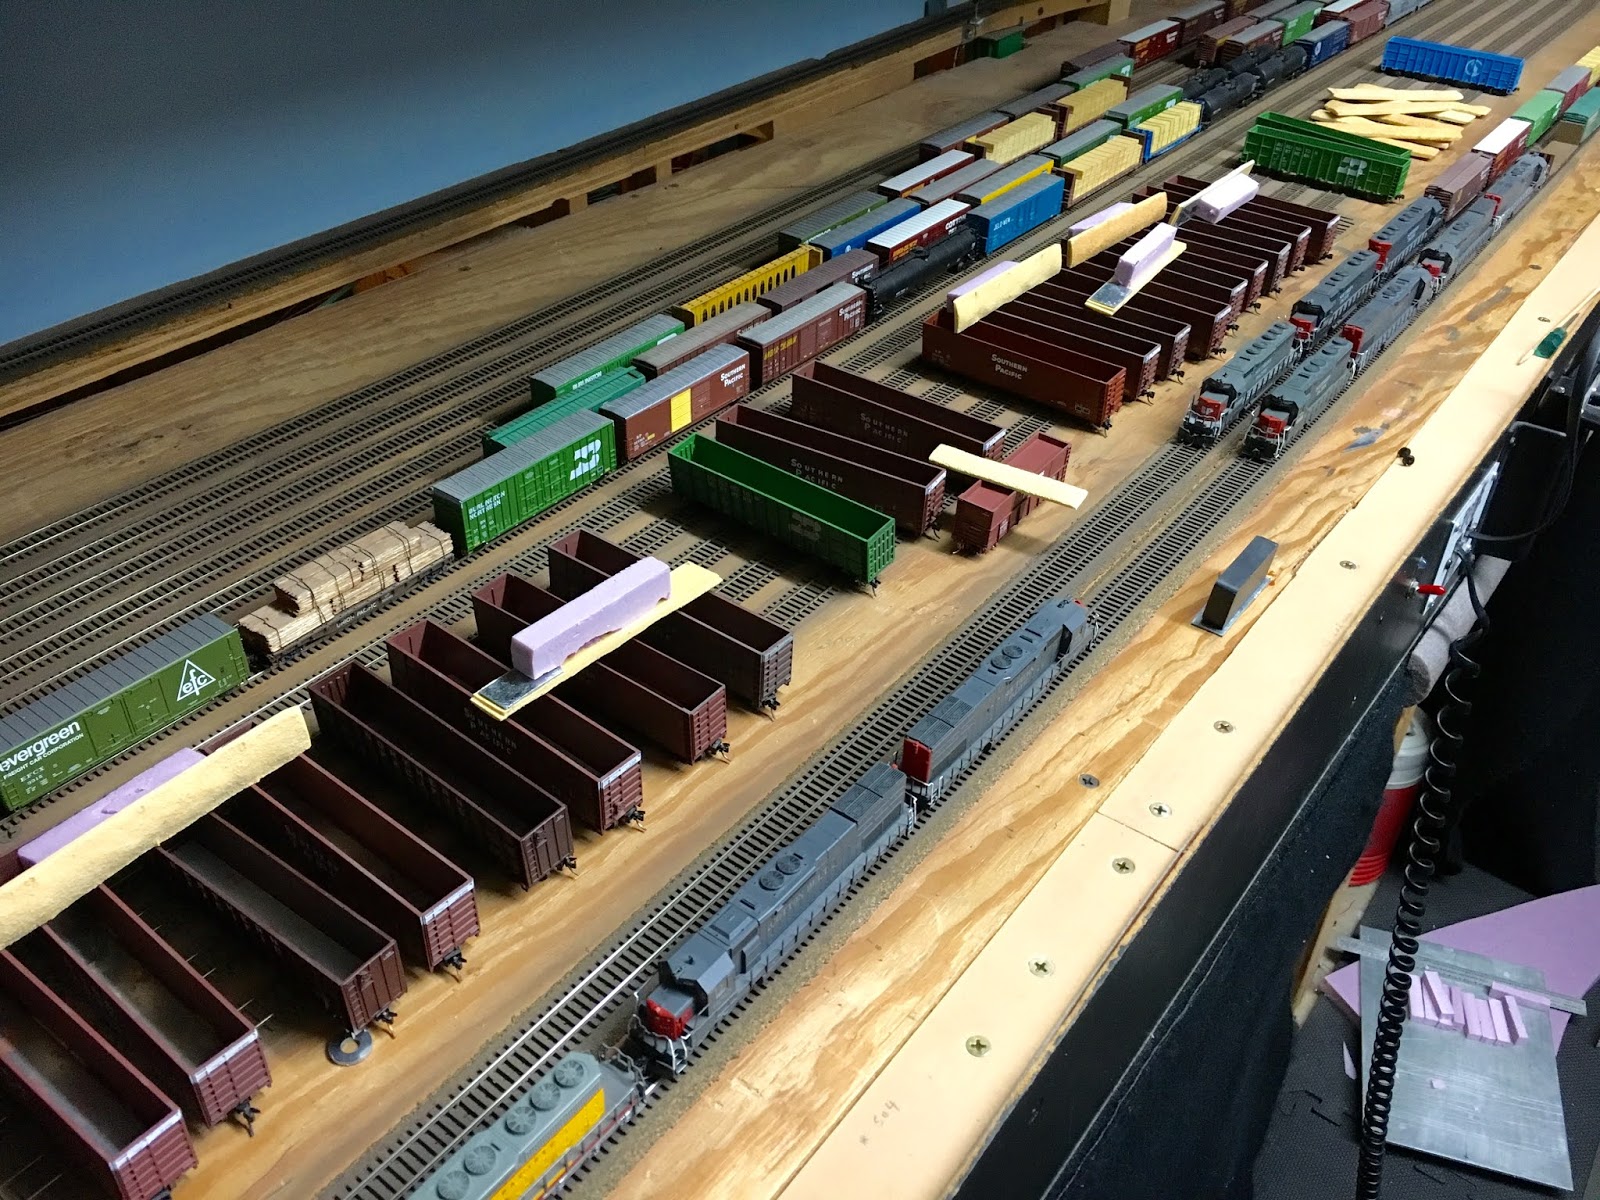
The solution was a magnetic chipload removal system, and a numbering scheme for each car and load that was still semi-interchangeable.  


I glued a steel piece of 16 ga steel to the underside on one end of each chip load. A nominal sized ceramic magnet lifts the load readily as long as the load is not too tight fitting. 


A block of pink foam was glued to the load to expedite loading, so that it would seat evenly and not fall too deep into the cars. 


Since the load length was typical, but the width was not, I still had to number each car in a class to match loads numbered for multiple classes. This allows a variation of 4 different load types to fit multiple cars but mostly +/- one load tolerance size either way. I have a total of 6 load sizes (labeled as ABC, BCD, CDE, DEF), that fit those various car sizes. This system has proven to be fairly user friendly, and pretty reliable so far. 
Cars move from industry via locals to yard, then via manifests to staging, and eventually reverse the process to destination for load exchange. There is always enough overlap between movements to allow the sessions to continue without loading/unloading interaction during ops.
Now we can run up to a full day of ops, and pick up where we left off with minimal interaction as compared to the restaging I had previously been saddled with. 

With the visible car load plan now working smooth, I returned to updating my latest revision of JMRI Ops, which has already been refined multiple times over the last couple years, but is finally working pretty well. I put a printer under the layout to actively print out manifests for easy access to new paperwork. Trying to deal with a full keyboard and monitor around the layout is at times necessary, but not very user friendly, so am also remotely running the Ops program from iphone to the printer with VNC during sessions. This allows manifests / switchlists to be printed for crews and the yardmaster as the trains arrive and depart.  Need to squeeze in a trial run utilizing the CATS program to notify JMRI that trains are arriving, so that the later will build trains automatically, with less me... 

Lots of projects to get caught up on here in print, but if this posts well (already see some issues), I can resume postings again, or at least till technology gets ahead of me again.
:)
Happy RRing

Saturday, January 19, 2019

Yard Panel Replacements

In an effort to complete the basic look of the layout,  the temporary foam board yard panels needed to be replaced so the curtain project could finally be completed.  The temp panels were just mounted to the facias with a few spacers, and were actually more durable than had been anticipated.  They definitely fulfilled their purpose in getting the layout up and operating fast.

The original / temp E. Eugene Yard Panel:
Each of the new replacement panels were made up from two sections to allow ease of installation and maintenance.  A hanger bracket, and the main panel section that simply screw together.  I made templates for the overall design and hole patterns.  Don cut and bent up the four steel panels at a 22 deg angle, so that they were more readily visible, yet didn't hang out into the aisle.

E. Eugene, W. Eugene, Portland, and Klamath Falls Panels:
Holes were drilled through the facia so the wires could pass through, as previously they were routed from under the facia, and were forcing the curtains to droop without support under the edge.  With the new panels being so close in design, I was able to do a direct swap of the existing toggles.

Wiring up the new E. Eugene Yard Panel with bracket in place:
The panels were designed to bolt to the face of the facia, but hang over the front to allow the Velcro strip along the bottom to remain uninterrupted  The felt curtains simply hang from the Velcro for ease of access under the layout.  Foam board scraps finish off the sides to provide end caps.  

Overhang to clear curtain access:
Nearing completion:
One down, three to go.

Friday, January 18, 2019

Bright Boys

The blog and layout have been dormant for over a year, partly due to needing a more active movement of cars without so much interaction. It was weiging me down, among other unrelated things / issues...  I've been working on the JMRI Ops Switchlist program, and have it flowing fairly well now, but still need to get it printing out on to my original copies of Espee Commom Standard forms.  But satisfied with where things were for now, it was time to run some trains again!
So I was using the Bright boy to clean track, and noticed the track wasnt getting as clean as it used to. I could run my finger down the rails after cleaning, and still get heavy black marks on my finger. I thought I had pretty much solved that old problem of dragging dirt around the layout, but it was back again. Years ago I figured out the Bright boy needs to be actively cleaned all the time. I have been using an old carpet scrap of indoor / outdoor carpet to rub both sides of the Bright boy back to its original brown color. For years I had just been slapping the carpet on the edge of the bench to keep it clean.  Lately I had thought my Bright boys were still pretty dark after their cleaning, and noticed that 5 year old carpet scrap staying pretty black too.  Well I decided to try running the carpet over to the sink with some warm soapy water, and it cleaned right up. Now the Bright boys are looking like new again and actually cleaning again.
Here's a quick vid on what kind of mileage you can get out of a Bright boy if you take care of it:
Clean that Bright Boy
Been working on some other projects that will post news on soon.

Sunday, September 10, 2017

You Tube Vid - Layout Overview

Not much progress to report, as have been catching up on loose ends for the most part, along with a few operating sessions along the way.
While preparing for next weekend's Ops Sess, I figured catch some footage of Amtrak's eastbound Coast Starlight running across the layout, and post it as an overall progress report of the layout at this point.  Shows lots of baggage that needs to be attended to, and a lot of temporary states of completion needed to get by, but still having a good time with it after all these years...  its slowly beginning to take shape.   :)
Grab an icy cold one and enjoy.


Friday, April 28, 2017

Layout DCC Network Upgrades

Our last ops session was way back in October due to some upgrade projects that have not played nice.  We had a faulty UT4R throttle that was causing radio communications to get blocked, but was intermittent (not the known DT400R sleep issue).  This had caused an unresolved set of issues but has now been ferreted out.  Things appear to be stable once again. We have added a few more DT300R and UT4R throttles to the layout since putting the new Amtrak trains in service (and another manifest), so every power lashup still maintains its own dedicated throttle during Ops. We also retired an old DT100 throttle that was never very user friendly, since the addition of the new throttles. Thanks to Ted C for one of the 300's as a gift... which Ray was able to repair, along with a couple more of his throttle additions also.  Yes we have a dedicated throttle for every consist, and each is stored at the yard office where the power set was last tied down.  Operators dont need any button other than throttle speed, direction, and accessory functions, which makes it user friendly for new operators unfamiliar with Dgtrx, as well as eliminating the baggage that goes along with entry errors.

Basically we have two computers running the layout now.  Windows no longer runs the signaling system, as Ray has set up a Rasperry Pi to run JMRI over a dedicated signal network.  To do that, we split the Digitrax Loconet into two separate buses, which rendered the new Signaling network, and a Throttle network.  The Signal Net runs from the RasPi through a Locobuffer terminator, and on to all the SE8C signal, BDL168 block detect, PSX circuit brkr, and Loco IO cards, along with a TC64 (more IO's).  The Throttle Net runs with Windows and JMRI from either / or the Layout / House desktop, through another Locobuffer (PR3 depending which), to the DCS200, DB150 booster, UP5, UR91 receiver, BDL168 cards, and to a dedicated port that drops Railsync from all the throttles.  The throttles are then powered by a dedicated 1 amp power supply to keep them stable (and prevent their batteries from discharging prematurely).

We ripped out all but one Dgtrx PM42 crt brkr card, and upgraded to PSX crt brkrs for all blocks other than internal yard tracks.  This should stabilize sound unit drop out issues we were having when a short occurred on totally unrelated blocks across the layout.
Funny, at the beginning of this layout build, all the wiring was so neat and thorough, but now we are short on real estate and have to fit in cards and devices wherever they may under Eugene Yard.... that has made for some less than stellar wiring practices as of late.... so no pics!

Unfortunately we lost 3 Win XP machines in the month of October to unrelated issues (AND a backup that was graciously provided failed on its monitor output)... wtf?  Ray is trying to cobble parts together so we can revive one machine to put the Dispatch machine back in service for the spare bedroom (which also has been a server for hosting ATCS), but typically remote ops make that machine just a backup.

A test ops has been set up for this weekend, to give the layout a thorough workout... but its starting to turn into more like a full blown ops session as the date has gotten closer.  I think we're good to go...

Friday, November 4, 2016

Backdrop progress

   I finally got all the layout backdrops installed and painted sky blue. I originally was going to utilize styrene sheets for backdrop material, but ended up going with Masonite for its stability, on almost the entire layout. I had thought styrene would be easier to paint on the bench and slide in after seeing how the foreground scenery was taking shape. As time went on I struggled with how to hang the sheets, and noted how other users had sagging and deformation issues with it. So I abandoned its use, and went with the Masonite, and painting directly on the drywall for the two remaining wall lengths.  Havn't decided what to do with the roll-up door, but maybe someday I will hang a skyboard across its length also, so that there is at least blue sky instead of the white door...  Seems like I do everything in the wrong order here (mostly due to the unforseen), so don't be surprised if someday I even hang valences over the layout after the fact...

The first place I focused on for additional backdrop detailing was a 14' stretch of drywall near Summit that I am painting directly on. This section has a viewing perspective where I just wanted a couple puffy clouds and a continuous tree line running its length to blend with the foregroumd trees. I thought this would be a good place to start developing my painting skills.
I started with a scrap piece of masonite that was used for the skyboards and painted it the same latex color blue. Then I used the cloud templates to airbrush some Tamiya white clouds in. I cut pink foam strips to elevate the template so the clouds would end up with softer lines, and taped it in place.

 I originally thought I would use multiple whites and grays, but just moving from heavy to lighter patches of white renders a pretty good effect.  I wish the sets came with more of these smaller cloud templates, but I am thinking combine other templates to make additional small variations. Once content with the samples, I started applying my new found skills directy on the drywall.

Next I went back to the practice board to work on my treeline skills. I matched tree colors to some latex paint from the box store.  I mixed final colors on a pallet and painted my practice treelines with a few feeble attempts. Color is one thing, but trying to find the right brush and get decent looking trees is an adventure. Some guys sure make it look easy!  Here was one of my earlier attempts:

I can see why some just resort to using a sponge to dab representations of trees on the backdrop, but that method looked a bit rough for what I want out of all this. To me it is striking if the foreground and background colors do not blend together, so I struggled a bit trying to get a decent color mix for the basic treeline. I went back and got another batch of colors to try it all again. Finally I was content with the colors and started work with the first layer on the drywall.

Use of a pallet and mixing the four colors of green I had, allowed some variation to the shadowing within the trees and variations from just one plain color.  I am fairly happy with how it is progressing, but will let it sit for awhile and see as time goes on what additions I want to do for further detailing... 
This is where I am at now:

I thought I would be able to get this section finished up before the NMRA Western Division meet, but due to being in the middle of the project, I opted to let ops / layout tours pass this time around...

Since getting the layout back up and running, hosted to a group of guys from Nor Cal, that had to endure a first time major Digitrax hiccup, but we were able to smooth things out eventually to make it a mostly regular session of good times.  Thanks goes to Steve H, John S, John Z, and Stuart H, for stopping by, not to mention my regulars (Dan M, Clark B, Mel J and Ray E) for coming up to be a part of it all. 
Latest adventure is the good old Win XP computer here died, and I had to purchase a new Win 10 machine (yuk).  Currently trying to update all the files to get the layout configured to work with the new system... then hopefully squeeze in one last ops before the Holidays come around.