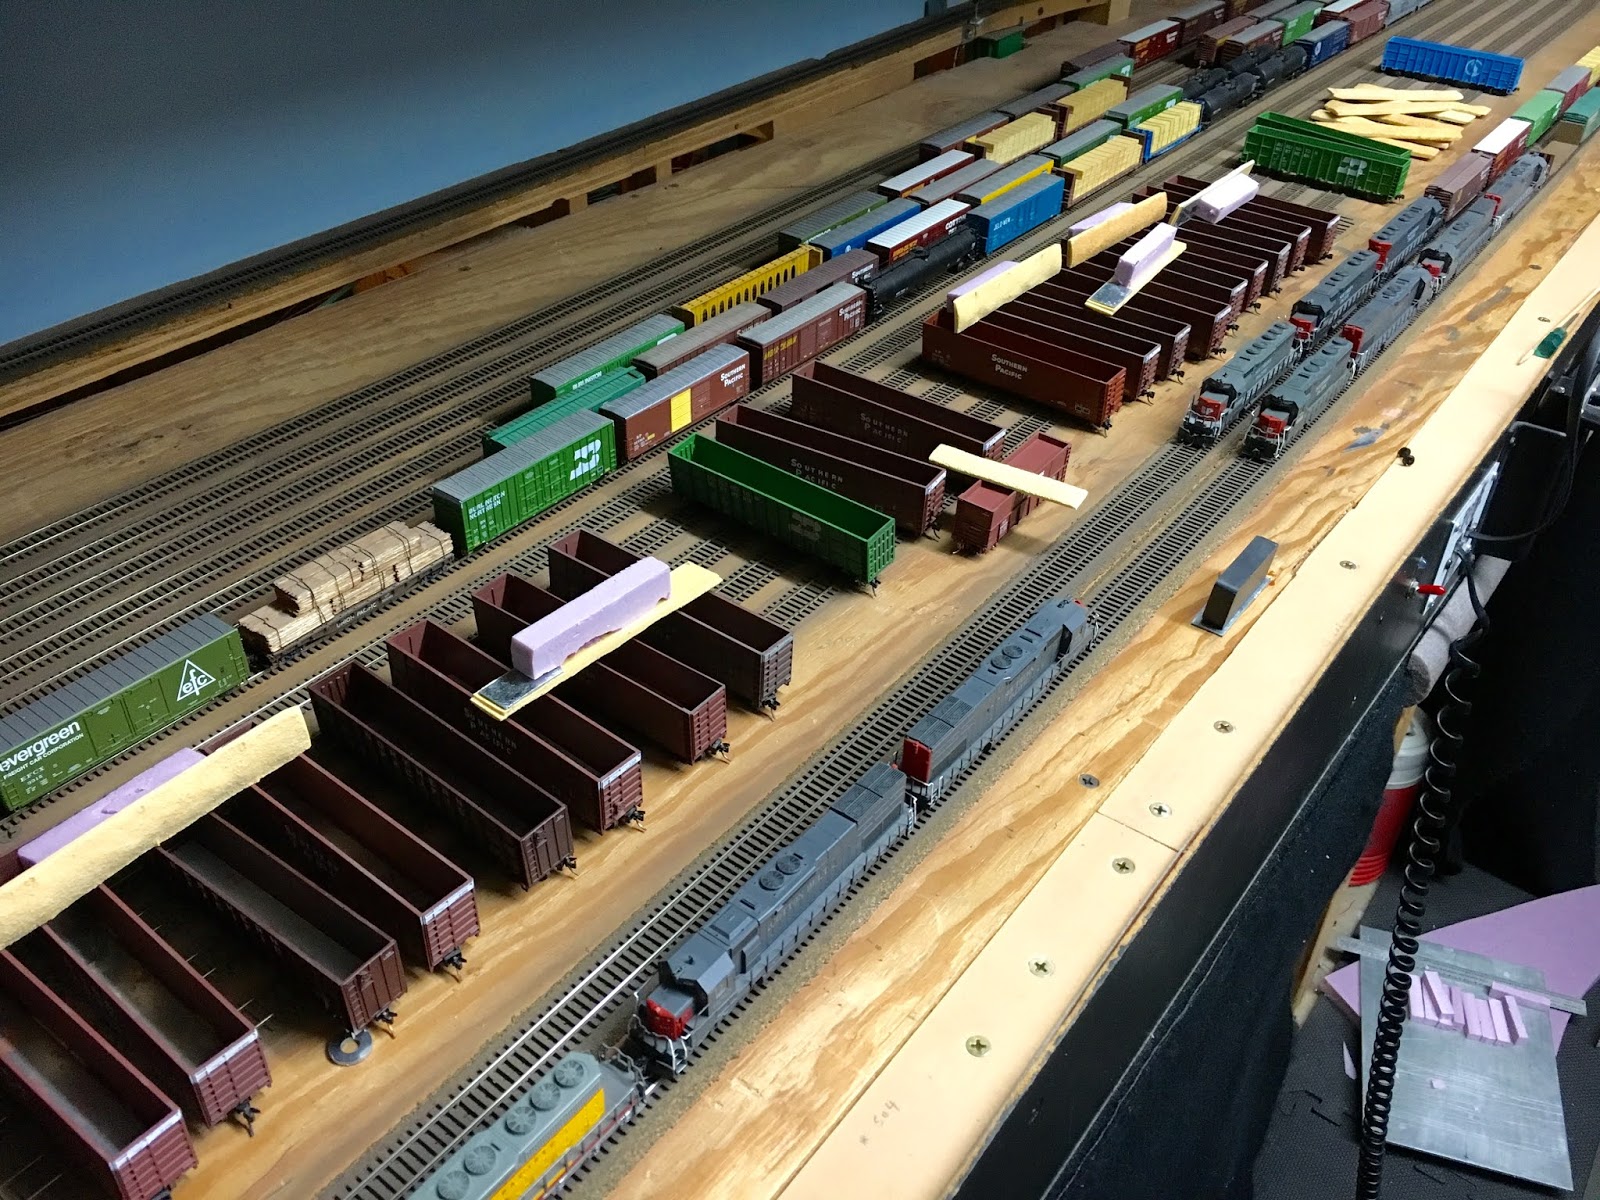
Image above captured on the upper deck of the layout where scenery has progressed to some extent...
Shot with Olympus C-750

Welcome to the SP Oregon Division!

An N Scale RR depicting the good old days along "The Friendly".

Friday, August 7, 2020

Box car fleet additions


Since the China factory shutdowns (and now Corona) the release of new products overall has been slow. Some of the backlog has finally started to hit the streets lately, but I have been getting frustrated from the lack of consistent product availability in N scale for quite some time (watching the HO scale pipeline isnt helping). I was happy to finally see the arrival of 4 new IM 50’ High Cube boxcars here, but the factory trucks and couplers just had to go. I replaced them with med draft MT 1037's for now, as the cars came with short shank body mount couplers and 36" wheels (just wrong). I mostly like the cars otherwise (x-LBF molds), but at some point I will body mount the extended draft couplers on them. By adding these cars to the layout, I was able to retire another block of stand-in MT 50’ SP/SSW boxcars that had never been up to my standards, and at this point I really wanted to get rid of more.  So I found 5 FVM 50’ FMC boxcars that had been forsaken on the back of my workbench that needed lowering. It was time to fix them and put my body mount Hydra-cushion couplers on them.

Before- you can see on the left how high these FVM double door boxcars rode as compared to a more accurate MDC/Roundhouse model 


After- is the lowered FVM with new extended couplers on left, coupled to the same MDC box (which has MT 1037 coupler). Note the difference where the etched platform now is with the coupler flush up underneath. This was done by grinding off some on the bolster, insetting the underframe deeper into the body, and notching the shell to make room for the extended body mount coupler (see body mount page).  The two cars have a different taper to the roof but are equal height at the peak.


The new fleet ready for assignment

Yes, they need a good layer of tunnel smoke too
I still have about 20 retired MT 50’ DD SP /SSW boxcars for disposal, if anyone is interested 

Thursday, August 6, 2020

Kato SDP40F Issues


Was struggling with repetitive stalling on one of my Kabo Kato LokSound units. Found that the OEM pc board that the Kobo installer soldered to, was barely making contact to one half of the frame via the board’s spring tension design, and that was no longer reliable. I ended up having to hardwire the decoder by tapping in a pair of 00-90 screws to fasten my own solder pads, which the power lead wires now connect to. 
The new pair of rectangular brass terminal blocks/solder pads installed:


The final install with black and red power leads soldered to new terminal blocks:


At one time I swore I would never model a passenger train on my layout. Not sure what happened but Amtrak’s Coast Starlight became an obsession over the years. I acquired rolling stock for the train(s) and started a couple kitbashes of this loco, then revisited a number of times over the years, but never followed through on the builds. Needless to say, but these locos look, run, and sound great, so really enjoying both my trains  #11 and 14 now. The only missing car(s) in the trains are the Pullman Standard 44 seat leg rest coaches. Maybe Kato can come through on that one someday too...

Wednesday, August 5, 2020

Removable Woodchip Loads


Been awhile since updating the blog (18 months), due mainly to planned obsolescence of devices and job justification of platform interfaces (ha), but hopefully have things working again so I can again share pics and bits of recent layout progress.

One of the biggest stumbling blocks for the layout having a continuous operating scheme here (ending and restarting ops at any point), had been the large amount of woodchip car loadings. There are currently close to 40 chip cars on the layout moving between the paper mill, staging, and lumber mills.  With all the non standard load sizes the chip cars required, it didnt seem very practical to utilize removable loads. Another issue was how to empty each of these cars without having to lift (or reposition) them from the layout, to avoid excessive handling. I had been restaging each car between sessions manually, which was a big pain anyway. I needed a way to load and unload the woodchips!  After diving into the use of JMRI Ops, I knew I had to figure a way to make the fleet of chip cars have interchangeable loads. The idea of staging identical car numbers and using the program to swap loads and empties sounded ok, but trying to acquire a loaded and empty version of each car number now days is dismal with manufacturers today releasing only one limited run of models (too late now). 
The solution was a magnetic chipload removal system, and a numbering scheme for each car and load that was still semi-interchangeable.  


I glued a steel piece of 16 ga steel to the underside on one end of each chip load. A nominal sized ceramic magnet lifts the load readily as long as the load is not too tight fitting. 


A block of pink foam was glued to the load to expedite loading, so that it would seat evenly and not fall too deep into the cars. 


Since the load length was typical, but the width was not, I still had to number each car in a class to match loads numbered for multiple classes. This allows a variation of 4 different load types to fit multiple cars but mostly +/- one load tolerance size either way. I have a total of 6 load sizes (labeled as ABC, BCD, CDE, DEF), that fit those various car sizes. This system has proven to be fairly user friendly, and pretty reliable so far. 
Cars move from industry via locals to yard, then via manifests to staging, and eventually reverse the process to destination for load exchange. There is always enough overlap between movements to allow the sessions to continue without loading/unloading interaction during ops.
Now we can run up to a full day of ops, and pick up where we left off with minimal interaction as compared to the restaging I had previously been saddled with. 

With the visible car load plan now working smooth, I returned to updating my latest revision of JMRI Ops, which has already been refined multiple times over the last couple years, but is finally working pretty well. I put a printer under the layout to actively print out manifests for easy access to new paperwork. Trying to deal with a full keyboard and monitor around the layout is at times necessary, but not very user friendly, so am also remotely running the Ops program from iphone to the printer with VNC during sessions. This allows manifests / switchlists to be printed for crews and the yardmaster as the trains arrive and depart.  Need to squeeze in a trial run utilizing the CATS program to notify JMRI that trains are arriving, so that the later will build trains automatically, with less me... 

Lots of projects to get caught up on here in print, but if this posts well (already see some issues), I can resume postings again, or at least till technology gets ahead of me again.
:)
Happy RRing

Saturday, January 19, 2019

Yard Panel Replacements

In an effort to complete the basic look of the layout,  the temporary foam board yard panels needed to be replaced so the curtain project could finally be completed.  The temp panels were just mounted to the facias with a few spacers, and were actually more durable than had been anticipated.  They definitely fulfilled their purpose in getting the layout up and operating fast.

The original / temp E. Eugene Yard Panel:
Each of the new replacement panels were made up from two sections to allow ease of installation and maintenance.  A hanger bracket, and the main panel section that simply screw together.  I made templates for the overall design and hole patterns.  Don cut and bent up the four steel panels at a 22 deg angle, so that they were more readily visible, yet didn't hang out into the aisle.

E. Eugene, W. Eugene, Portland, and Klamath Falls Panels:
Holes were drilled through the facia so the wires could pass through, as previously they were routed from under the facia, and were forcing the curtains to droop without support under the edge.  With the new panels being so close in design, I was able to do a direct swap of the existing toggles.

Wiring up the new E. Eugene Yard Panel with bracket in place:
The panels were designed to bolt to the face of the facia, but hang over the front to allow the Velcro strip along the bottom to remain uninterrupted  The felt curtains simply hang from the Velcro for ease of access under the layout.  Foam board scraps finish off the sides to provide end caps.  

Overhang to clear curtain access:
Nearing completion:
One down, three to go.

Friday, January 18, 2019

Bright Boys

The blog and layout have been dormant for over a year, partly due to needing a more active movement of cars without so much interaction. It was weiging me down, among other unrelated things / issues...  I've been working on the JMRI Ops Switchlist program, and have it flowing fairly well now, but still need to get it printing out on to my original copies of Espee Commom Standard forms.  But satisfied with where things were for now, it was time to run some trains again!
So I was using the Bright boy to clean track, and noticed the track wasnt getting as clean as it used to. I could run my finger down the rails after cleaning, and still get heavy black marks on my finger. I thought I had pretty much solved that old problem of dragging dirt around the layout, but it was back again. Years ago I figured out the Bright boy needs to be actively cleaned all the time. I have been using an old carpet scrap of indoor / outdoor carpet to rub both sides of the Bright boy back to its original brown color. For years I had just been slapping the carpet on the edge of the bench to keep it clean.  Lately I had thought my Bright boys were still pretty dark after their cleaning, and noticed that 5 year old carpet scrap staying pretty black too.  Well I decided to try running the carpet over to the sink with some warm soapy water, and it cleaned right up. Now the Bright boys are looking like new again and actually cleaning again.
Here's a quick vid on what kind of mileage you can get out of a Bright boy if you take care of it:
Clean that Bright Boy
Been working on some other projects that will post news on soon.

Sunday, September 10, 2017

You Tube Vid - Layout Overview

Not much progress to report, as have been catching up on loose ends for the most part, along with a few operating sessions along the way.
While preparing for next weekend's Ops Sess, I figured catch some footage of Amtrak's eastbound Coast Starlight running across the layout, and post it as an overall progress report of the layout at this point.  Shows lots of baggage that needs to be attended to, and a lot of temporary states of completion needed to get by, but still having a good time with it after all these years...  its slowly beginning to take shape.   :)
Grab an icy cold one and enjoy.


Friday, April 28, 2017

Layout DCC Network Upgrades

Our last ops session was way back in October due to some upgrade projects that have not played nice.  We had a faulty UT4R throttle that was causing radio communications to get blocked, but was intermittent (not the known DT400R sleep issue).  This had caused an unresolved set of issues but has now been ferreted out.  Things appear to be stable once again. We have added a few more DT300R and UT4R throttles to the layout since putting the new Amtrak trains in service (and another manifest), so every power lashup still maintains its own dedicated throttle during Ops. We also retired an old DT100 throttle that was never very user friendly, since the addition of the new throttles. Thanks to Ted C for one of the 300's as a gift... which Ray was able to repair, along with a couple more of his throttle additions also.  Yes we have a dedicated throttle for every consist, and each is stored at the yard office where the power set was last tied down.  Operators dont need any button other than throttle speed, direction, and accessory functions, which makes it user friendly for new operators unfamiliar with Dgtrx, as well as eliminating the baggage that goes along with entry errors.

Basically we have two computers running the layout now.  Windows no longer runs the signaling system, as Ray has set up a Rasperry Pi to run JMRI over a dedicated signal network.  To do that, we split the Digitrax Loconet into two separate buses, which rendered the new Signaling network, and a Throttle network.  The Signal Net runs from the RasPi through a Locobuffer terminator, and on to all the SE8C signal, BDL168 block detect, PSX circuit brkr, and Loco IO cards, along with a TC64 (more IO's).  The Throttle Net runs with Windows and JMRI from either / or the Layout / House desktop, through another Locobuffer (PR3 depending which), to the DCS200, DB150 booster, UP5, UR91 receiver, BDL168 cards, and to a dedicated port that drops Railsync from all the throttles.  The throttles are then powered by a dedicated 1 amp power supply to keep them stable (and prevent their batteries from discharging prematurely).

We ripped out all but one Dgtrx PM42 crt brkr card, and upgraded to PSX crt brkrs for all blocks other than internal yard tracks.  This should stabilize sound unit drop out issues we were having when a short occurred on totally unrelated blocks across the layout.
Funny, at the beginning of this layout build, all the wiring was so neat and thorough, but now we are short on real estate and have to fit in cards and devices wherever they may under Eugene Yard.... that has made for some less than stellar wiring practices as of late.... so no pics!

Unfortunately we lost 3 Win XP machines in the month of October to unrelated issues (AND a backup that was graciously provided failed on its monitor output)... wtf?  Ray is trying to cobble parts together so we can revive one machine to put the Dispatch machine back in service for the spare bedroom (which also has been a server for hosting ATCS), but typically remote ops make that machine just a backup.

A test ops has been set up for this weekend, to give the layout a thorough workout... but its starting to turn into more like a full blown ops session as the date has gotten closer.  I think we're good to go...