Espee Oregon Division Project Pages

Friday, November 4, 2016

Backdrop progress

   I finally got all the layout backdrops installed and painted sky blue. I originally was going to utilize styrene sheets for backdrop material, but ended up going with Masonite for its stability, on almost the entire layout. I had thought styrene would be easier to paint on the bench and slide in after seeing how the foreground scenery was taking shape. As time went on I struggled with how to hang the sheets, and noted how other users had sagging and deformation issues with it. So I abandoned its use, and went with the Masonite, and painting directly on the drywall for the two remaining wall lengths.  Havn't decided what to do with the roll-up door, but maybe someday I will hang a skyboard across its length also, so that there is at least blue sky instead of the white door...  Seems like I do everything in the wrong order here (mostly due to the unforseen), so don't be surprised if someday I even hang valences over the layout after the fact...

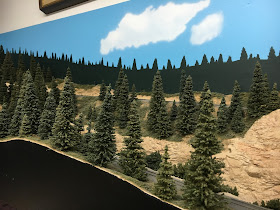
The first place I focused on for additional backdrop detailing was a 14' stretch of drywall near Summit that I am painting directly on. This section has a viewing perspective where I just wanted a couple puffy clouds and a continuous tree line running its length to blend with the foregroumd trees. I thought this would be a good place to start developing my painting skills.
I started with a scrap piece of masonite that was used for the skyboards and painted it the same latex color blue. Then I used the cloud templates to airbrush some Tamiya white clouds in. I cut pink foam strips to elevate the template so the clouds would end up with softer lines, and taped it in place.

 I originally thought I would use multiple whites and grays, but just moving from heavy to lighter patches of white renders a pretty good effect.  I wish the sets came with more of these smaller cloud templates, but I am thinking combine other templates to make additional small variations. Once content with the samples, I started applying my new found skills directy on the drywall.

Next I went back to the practice board to work on my treeline skills. I matched tree colors to some latex paint from the box store.  I mixed final colors on a pallet and painted my practice treelines with a few feeble attempts. Color is one thing, but trying to find the right brush and get decent looking trees is an adventure. Some guys sure make it look easy!  Here was one of my earlier attempts:

I can see why some just resort to using a sponge to dab representations of trees on the backdrop, but that method looked a bit rough for what I want out of all this. To me it is striking if the foreground and background colors do not blend together, so I struggled a bit trying to get a decent color mix for the basic treeline. I went back and got another batch of colors to try it all again. Finally I was content with the colors and started work with the first layer on the drywall.

Use of a pallet and mixing the four colors of green I had, allowed some variation to the shadowing within the trees and variations from just one plain color.  I am fairly happy with how it is progressing, but will let it sit for awhile and see as time goes on what additions I want to do for further detailing... 
This is where I am at now:

I thought I would be able to get this section finished up before the NMRA Western Division meet, but due to being in the middle of the project, I opted to let ops / layout tours pass this time around...

Since getting the layout back up and running, hosted to a group of guys from Nor Cal, that had to endure a first time major Digitrax hiccup, but we were able to smooth things out eventually to make it a mostly regular session of good times.  Thanks goes to Steve H, John S, John Z, and Stuart H, for stopping by, not to mention my regulars (Dan M, Clark B, Mel J and Ray E) for coming up to be a part of it all. 
Latest adventure is the good old Win XP computer here died, and I had to purchase a new Win 10 machine (yuk).  Currently trying to update all the files to get the layout configured to work with the new system... then hopefully squeeze in one last ops before the Holidays come around.

Monday, August 15, 2016

Cascade Summit changes

 20 years ago I started to built the layout for 3 DC throttles (and a yard master)... not thinking much about operations in the long run.  I liked the idea of trains running at eye level on the highest sections of the layout... but not everyone stands at over 6' like I do.  So now we operate with a regular crew of 10 people running the railroad (not all as tall as me).  I never really got it, when some of the guys said they couldn't "see" the layout...
Lately I was painting the last of the blue sky sections to complete the basic backdrops (finally), so I had to tear out some old scenery left behind from before the peninsula expansion project went in (a lumber mill for the Klamath Northern short line will be going in where a hill used to stand).  It suddenly dawned on me that there was a problem at the west end of Cascade Summit siding, as its view was blocked by a hill rising up from the fascia... 

Wow, how do some of these guys know where the fouling point is when they come to the end of the siding? 
Sorry guys! 
So I continued tearing out more plaster and got a tool out that I thought I would never need for the layout again... the jigsaw!  I cut down about a two foot section of fascia closer to near roadbed level.

This has opened up the view of that end of the siding from a couple angles, and I hope it makes life a little easier on the crews.  Not to worry, I will still put some more pine trees in to help obscure the view of that fouling point!  LOL  ...but it will sure be a lot better than it was.
A work in progress...

Sunday, August 14, 2016

Amtrak Coast Starlight progress

   For modelers of the Coast Starlight, each year Amtrak made subtle roster changes to its Heritage fleet of cars that are notable to specific time frames.  Since mid '78 is the target era for my layout (with some minor deviations), I have tried to research the correct power and car consists to do these trains some justice.  By mid '78 it was still a mixed bag of what you would see the Starlight equipped with out on the road, but by then it was common to see it with a fairly consistent 12 car consist of mostly x-ATSF cars.  Typically behind the head end was the bag, followed by a bag dorm, 6 coaches (the third was usually a slab side x-NP/GN dome), followed by the PS dome lounge, a diner, and a couple Budd 10-6 sleepers.

I am modeling both a northbound and southbound train (direction contrary to SP nomenclature), but they are close in consist for the most part, with minor car substitutions from time to time.  I have acquired a couple nice baggage cars from Kato.  I pulled the first baggage car (Pullman Standard) from their Sunset Limited set, the other (Budd) was pulled from their earlier 4 car set that I de-skirted.  The car looks better less the skirts as long as it still has the stirrups intact.  For some reason Kato left the stirrups off on their latest PS baggage model, even though they have included them on other cars... 

To do the skirt removal on various cars, I used a pair of end nippers that were ground down on the ends, then filed the sills to clean up the rest.

The bag dorm in this era was an x-SCL car, but I am forced to use old Con-Cor cars from the 5 car-sets as a stand in for now (only one of which has been de-skirted so far).

The most common coach was a 44 seat leg rest coach from PS, but unfortunately there are no current manufacturers that make the correct PS coaches to fill this train out.  It is a sad state of affairs until either that changes, or the more unlikely, that I decide to kitbash a large quantity of them.  Brass car sides are available, but the layout is consuming most of that kind of labor hours for now. 

The next most common coach was a twin window 48 seat Budd coach that was made by Walthers, but Im still hunting for a few more (Found!). 

Intermountain made a Shasta 44 seat coach that was not as common, but another correct model.  Unfortunately coming up dry on these also over the last six months of searching, so let me know if you see either car in Amtk colors out there (also Found!) 

I took the slab side Coach Domes from the Con-Cor sets, and painted the window mullions silver, along with spraying flat black over the stock silver trucks... which make these cars look better overall.

The rest of my coach cars for now are rough renditions from the Con-Cor sets (that I cant wait to exchange for the proper models - half have been de-skirted with trucks painted black, which helps a little), or excess Kato sleepers (ugh).  The Pullman Standard Dome Lounges I acquired from both the Kato Sunset Limited set, and also one from Con-Cor, the later is not a bad model (other than its list price).  The diners are each different from the two Kato sets (one x-CBQ, the other ATSF).  Regarding the sleeper cars, I de-skirted both the Budd and PS 10-6 versions from the four car set for one train (which was not as common as 2 Budd sleepers), and am using 2 of the Budd 10-6 cars with an Indian (from the Sunset Limited set) for the other train.  Typically summer and Holiday trains were longer and got the extra bedroom car on the rear, hence my addition of the Indian on one of the trains for now.  Here is a rear end shot of the "Indian Pony" taken by George Hamlin. 

I found it intriguing that many of the doors were sporting red paint at the time (but dont know why), with a marker hanging on the end gate, so I just had to try to duplicate this look for the end of my trains also. 
I have opted for both trains to have a Pullman Standard car on the rear of the train due to the lack of availability for Budd style end gates.  To reproduce this look on the end of my trains, I have got as far as painting the doors red, and getting most of the parts cobbled together:

 The end gates are from Rapido Trains (thanks Jason!).  Not currently satisfied with the size of the end marker as it is a bit large, but it might just have to do until better comes along...  Ray has donated a couple of his HO keep-alive circuits to light the end markers (they fit without trimming any interior).

I cut the brass contact strips on my trusty paper cutter that provide power to the circuit, as well as for a few other cars to get current sensing with the signal detection.

Most of the other Kato cars got the standard wheel treatment, with surface mount resistors and conductive paint.
One other thing on the to-do list is to put the pointless arrows on some of the cars that came in Ph II paint, but most of those cars are stand-ins at this point anyhow...
Still getting a bit of a kick out of this whole project...

Saturday, August 13, 2016

Kato Amtrak SDP40F's arrive

 After years of  Lima shells and Atlas SD60 underframes haunting me, and calling me to build my Coast Starlight train(s), Kato has finally come along with the right stuff to motivate me to get it done.  I'll post more on this Starlight project, but first wanted to cover these new locos.

My era being modeled was the transition from the Ph I paint shimmy to the Ph II, so I was even more excited when they announced both were being offered.  My first two SDP40F's arrived and I finally got around to putting the TCS K7D4 decoders in them.  I had a hard time getting the shell off the first one to install the decoder.  Not much help from TCS or on-line, but I finally figured out the trick to getting them apart.  I started with the rear first by removing the handrails from the pilot.  The ears on the underframe that hold the shell on, snap into the window glass rather than the body shell itself.  There is only one tab used on the engineer's side to release the glass / shell at the rear end, so once you get that loose, the shell will start to lift up. You can see the notch in the glass that lines up with the frame ear in the pic below:

  When prying the shell away from the frame, make sure the window sections are not separated from the shell (I stuck an x-acto blade between the window glass and the frame).  The hard part is the front.  Release the front tabs simultaneously (one on each side, on-center of the cab windows).  When the frame ears release from the window / shell, the body will easily pull straight up... without any twisting or bending as some have recommended. 

 You can see it is not impossible to add the Mars feature with an 0603 LED, by separating the upper lens from the number board section, but I will revisit that some other day. 


I'm still waiting for my Kabo sound versions to arrive, as they have been delayed for a couple months now... but these first two are nothing less than I would expect from Kato.  Ready to run out of the box except you might want to add the trip pins that come separate in the box.
A preliminary shot of the first train slowly coming together...
Looking forward to integrating these new trains into the operations... but unfortunately, some key features (to me), will be a work in progress for some time to come.

Tuesday, June 14, 2016

Tools of the trade

Today I was following up on a small list of issues that were found during last weekend's ops session.  One of the Bad Order forms was a boxcar that derailed on a switch in the Weyerhaeuser mill.  I used to be able to stick my face right down on a turnout and see what was going on, but the eyeballs are slowly fading, so I use the headset magnifiers a lot more now.  I was unable to get my head under the upper deck with the Optivisor on, and at the correct angle to inspect the turnout.  So I pulled out one of my newer tools as of late (Iphone 6S), and turned on the video mode with flash to get a closer look.  The latest version now has zoom capability in the video mode, so it is a sweet tool for being able to quickly get a real close look (and without storing any data).  Below are a couple still images that portray what is seen, and how helpful it is to make use of this tool when the work angle is not user friendly.  Many of you probably do this without thinking much about it, but I know a lot of guys that have phones that dont utilize them, still have not moved to a smart phone, or are just stuck in their old ways (like me).
Here is a shot of the work area I was trying to get my head under (it didnt seem so bad 15 years ago!):

Here is a "before" image where the flange was getting caught on a handlaid switch point, because the gauge was a bit narrow:

I moved the point over slightly and took an "after" shot which reveals plenty of extra clearance now:


Sometimes we overlook the obvious, so just wanted to share with the rest of you all.
Happy RRing!

Monday, June 13, 2016

SouCalOps - 2016 recap

SouCalOps is a group of layout owners in the greater Los Angeles area that have been contributing to layout operating sessions on a bi-annual schedule... well, this is only the second of hopefully more to come.  Many thanks goes to Al D. for coordinating the event. Invited guests are pulled from other operating groups across the country, many configured in a similar fashion.  This last weekend was the first that I have participated, and had a great time hosting my layout.  It was three days of operations on 13 different layouts, with two addition bonus days for those that just couldn't get enough.  There were also clinics at the main hotel, a feature dinner, and layout tours.  We had guests operate the layouts coming from Van Rails, Bay Rails, Arizona, Colorado, San Diego, and more. Guests spent most of the day here Saturday operating the layout, and I kept the layout open for layout tours, which ended up extending our operations well past the dinner hour.  Special thanks to my local helpers for working all that overtime (also our guest dispatcher from BC Canada), and making it an enjoyable day for all.  It is a pleasure to get responses from my crews post-ops, on how much they enjoyed themselves.  Thanks to all who participated in making this an event to remember!

Sunday, June 12, 2016

More pulling power for that yard goat

I have a Life Like SW1200 that has been working the layout all by itself for years.  It wasn't until I bought a Micro Trains SW1500, that I realized what a masterpiece that SW1200 really was.  They both use virtually the same mechanism, but with some added weight on the SW1200, it could pull like crazy as compared to its sibling SW1500.
Ray Eiser installed a decoder and added some Tungsten putty to the SW1200 (including front and rear headlights, and hardwired pick-up), before it ever went into service on the layout, so I never thought much about its pulling power.  Once my new SW1500 arrived, I was really amazed at what a difference there was between the two.  It has been on the to-do list to have a tug-o-war between the two and see just how much difference there was between them.  I finally slapped together a couple vids and posted them on You Tube.
Check out the video links to see just what a little bit of extra weight can really do for your locomotive fleet!

You Tube- SW1500 vs SW1200 Tug-O-War

You Tube- SW1200 vs SD9 Tug-O-War

Saturday, April 16, 2016

Cascade Sub Layout Milestone:

Well, for those of you who feel like you are not making enough progress on your layout... you are not alone.
This April marks the 20th anniversary of layout construction here.  Family comes first, but I sure enjoy this hobby.  I told my wife way back when, that I would be done with the layout by 2016, and it is apparent there is still a lot of work ahead.  A conventional single level linear layout would have been my first choice for ease of construction and walk-around design, but I am grateful to have been able to cram this multi-deck spaghetti bowl into our garage at all.  For the most part it still retains mostly walk-around design features (with a few hiccups), but its configuration has swallowed significant labor hours as opposed to a more traditional linear design.  Adding the peninsula to the layout was not part of the original plan (started back in 2011), so I tell myself I would still be on schedule otherwise (lol).  At least now things are finally moving more to the scenery stages, so I am glad to have put the saws and drills away for the most part.  Slow but steady progress has been, and still remains the norm.

Looking forward to sharing my progress as a layout host for SoCalOps 2016 in June.

Crew Call Board

After seeing what Bill was using for a call board on his Southern Pacific Cascade Line, I realized what a good fit a magnet board was for operations here also.  So I stole his idea and tweaked things a bit to conform how operations are handled on this end (Thanks Bill!).  Hopefully this also makes life easier for the Crew Dispatcher.  There are six columns configured in an attempt to help crews get a general overview of their next job.  Typically trains are run by just an Engineer, but adding an option for a Conductor allows for unfamiliar operators to mark up with an engineer on mainline trains, and also for operators that like working as a two man crew for switch jobs.  Train ID and lead Engine number columns help crews find their paperwork and consist at the corresponding yard office.  The call-out Time is to work with the recently installed clocks on the wall (which are also for coordinating Work and Time with the dispatcher).  I have incorporated the latter to spread out the sudden start-up of operations at the beginning of sessions (which has been neglected for so long).  The departing station refers to the specific yard office where the orders and throttle are to be picked up by crew members.


Foam Base Scenery Progress


I  have been slowly adding more pink Styrofoam around the layout to get a feel for the basic concepts and how it is all going to fit together.  Static foam waste is entertaining stuff, so I am trying to get all the major pieces installed across the whole layout before moving forward on any other level of scenery.  Still need to configure the foam closer to natural curvatures, but at least now I can see how this is all coming together.  For some reason I don't' mind white plaster unfinished sections laying dormant for years at a time, but I think the pink foam will be a good motivator to hurry up and get er' done.  I am already eager to get all this painted a brown earth color asap, but will have to revisit each section for final shaping before that ever happens.  Maybe that can be the next phase of the project...

I am using mostly 2" foam board, but thanks again to Chip for helping to acquire some 1" foam, which has helped to speed up installation in many areas.  Some foam sections have still been too thick to lay flush with the needed finish height due to framework, so slots have been carved out in the foam.  This maintains a sturdy sub base for planting of vegetation, with significantly less carving on the topside.  I just cut along each side of the groove with a big disposable knife, and rock a chisel bit through to clean out the cross-member grooves:
 

One example of where I needed the foam to lay down low:

I am running a highway along the backdrop here with a couple of highway overpasses to conceal the tracks where they dive into the backdrop.  Tree foliage is my friend all over the layout to hide all these transitions.  It has been time consuming fitting all the irregular shapes in, but still have more trimming and shaping to get it right.  I take cardboard and make templates so that I can overlay it on the foam board, then trace around them to make best use of each sheet.  A number of labor hours still needed here to get the contours right, but its nice to see the basic idea finally taking shape:


I need to cut in the truss bridges here so I can envision better on how the riverbank is going to take shape:


Hoping to get all the sections pre-shaped before gluing into place, as I'm not too excited about trying to reshape in confined ares after the fact.  Most of the foam is cut and carved with a 3" knife that uses disposable blades.  I will follow up with more carving to get as close as possible adjacent to track sections and multiple layering, then follow up with rasps to blend the overall contours.  Just shooting from the hip on it all, as this foam stuff  is a new concept for me.  One thing for others to note, make sure you build your layout with a bunch of right angles to work with instead of abstract....    :)
 
Back to work!