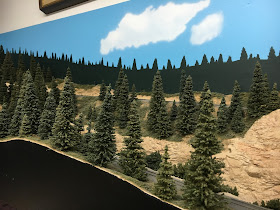
The first place I focused on for additional backdrop detailing was a 14' stretch of drywall near Summit that I am painting directly on. This section has a viewing perspective where I just wanted a couple puffy clouds and a continuous tree line running its length to blend with the foregroumd trees. I thought this would be a good place to start developing my painting skills.
I started with a scrap piece of masonite that was used for the skyboards and painted it the same latex color blue. Then I used the cloud templates to airbrush some Tamiya white clouds in. I cut pink foam strips to elevate the template so the clouds would end up with softer lines, and taped it in place.
Next I went back to the practice board to work on my treeline skills. I matched tree colors to some latex paint from the box store. I mixed final colors on a pallet and painted my practice treelines with a few feeble attempts. Color is one thing, but trying to find the right brush and get decent looking trees is an adventure. Some guys sure make it look easy! Here was one of my earlier attempts:
I can see why some just resort to using a sponge to dab representations of trees on the backdrop, but that method looked a bit rough for what I want out of all this. To me it is striking if the foreground and background colors do not blend together, so I struggled a bit trying to get a decent color mix for the basic treeline. I went back and got another batch of colors to try it all again. Finally I was content with the colors and started work with the first layer on the drywall.
Use of a pallet and mixing the four colors of green I had, allowed some variation to the shadowing within the trees and variations from just one plain color. I am fairly happy with how it is progressing, but will let it sit for awhile and see as time goes on what additions I want to do for further detailing...
This is where I am at now:
I thought I would be able to get this section finished up before the NMRA Western Division meet, but due to being in the middle of the project, I opted to let ops / layout tours pass this time around...
Since getting the layout back up and running, hosted to a group of guys from Nor Cal, that had to endure a first time major Digitrax hiccup, but we were able to smooth things out eventually to make it a mostly regular session of good times. Thanks goes to Steve H, John S, John Z, and Stuart H, for stopping by, not to mention my regulars (Dan M, Clark B, Mel J and Ray E) for coming up to be a part of it all.
Latest adventure is the good old Win XP computer here died, and I had to purchase a new Win 10 machine (yuk). Currently trying to update all the files to get the layout configured to work with the new system... then hopefully squeeze in one last ops before the Holidays come around.


Hey Jeff. Looks great. I recently had similar issues as you with the computer. Much of my RR is JMRI controlled and getting all that into a new computer has been a bitch not to mention the Win 10 issues. Good luck!
ReplyDeleteThe layout's signal control is moving over to a Raspberry Pi 3.
DeleteSmall package that can do all the things needed for layout operations wise, like signal control and WiFi.
Ray Eiser
What up on the Friendly?
ReplyDelete